Objective
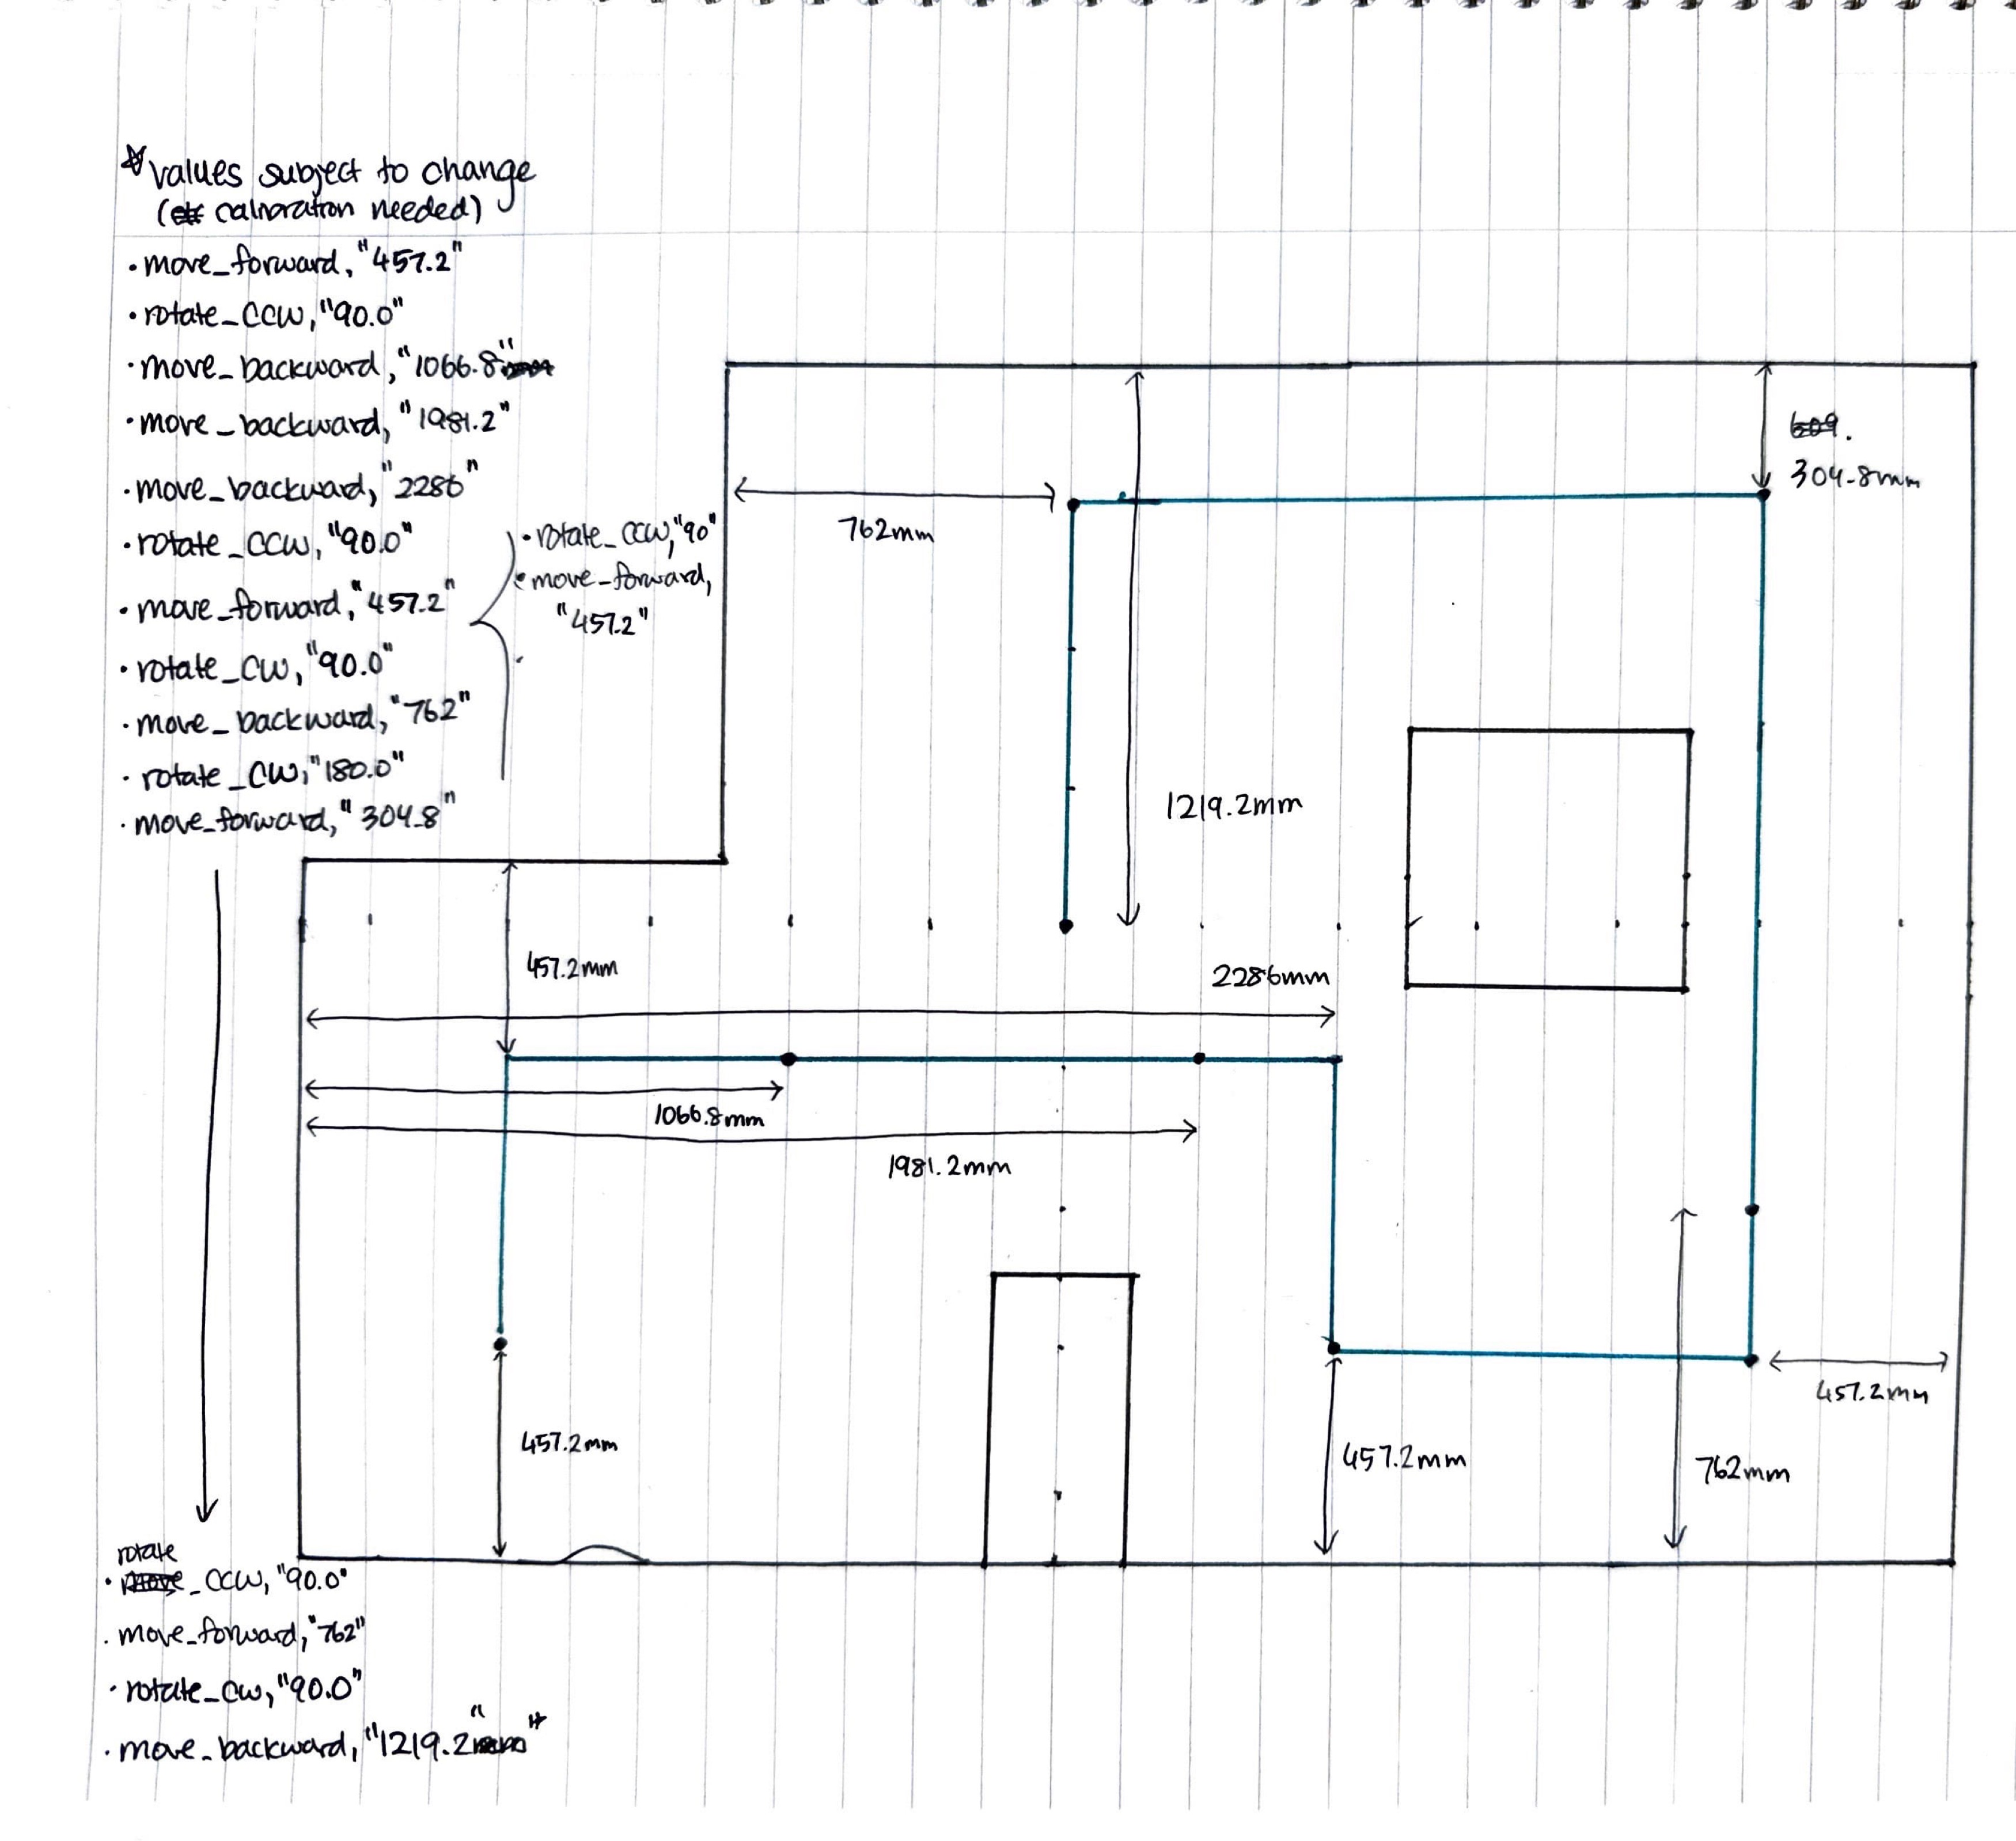
The objective of this lab is to hit the waypoints shown below as quickly and accurately as possible.

My method
As mentioned in the previous lab (Lab 11) my robot was not good in localization in certain areas in the arena -- mainly the left bottom corner. Thus, I opted to use PID control for most of the waypoints because PID control is easier and less time consuming to implement and has the most successful rate throughout the semester. I was planning to add localization after I succeed with PID, but due to time crunch and high density in lab area, I couldn't do that part.
To maximize accuracy, I decided to perfectly tune my 90 degrees turn and straight movements for the whole duration. Thus, rather than going on an angle from the first waypoint to the second, I would first go straight, turn 90 degrees and then stop at the second waypoint. This is definitely a less efficient way to get all the spots, but due to lacking motor capacities, it is the most reliable method. Shown below is the trajectory that my robot will be taking.

Through calibration process (details in the next section), I decided to change some of the aspects in the initial plan above and mainly use MOVE_FORWARD and ROTATE_CCW commands.
Calibration
Before integrating all pd controls together, I each calibrated the commands I am using for execution. The three commands used in this lab were MOVE_FORWARD, MOVE_BACKWARD, and ROTATE_CCW. I originally planned to have four commands with ROTATE_CW, but during the calibration process I found that rotating counter clockwise was more reliable and accurate, so I decided to just use ROTATE_CCW and use 270 degrees turn when I needed 90 degrees clockwise rotation. Further, I tuned Kp, Kd and the distance values for each stop I am taking during the execution. The code snippets and videos are explained below.
MOVE_FORWARD
The command for moving foward was very similar to the PID task in lab 6. I essentially used the same code (shown below). And for the exact distance measurment, I calibrated in the lab space to adjust the fine details of the exact distance setpoint for each stop.
Because the ToF sensor was located in the rectangular 'box' for the battery, the setpoint distance was around 70 mm shorter than the actual distance.
MOVE_BACKWARD
The moving backward command used the same framework and Kd/Kp values as the MOVE_FORWARD command. This command was only used the final step, where the robot moved from waypoint 8 to 9. This is due to the short width of the middle-bottom box (when the robot wasn't exactly on stright y-axis, it will meaure the distance from the bottom wall, messing up the final stopping point). Thus, instead of turning counter clockwise and moving straight towards waypoint 9, I decided to turn 270 degrees counterclockwise and move backwards to the final waypoint.
ROTATE_CCW
The only part to calibrate for the rotation movement was the Kp and Kd for PD control since all my rotations were 90 or 270 degrees. The Kp Kd values differed quite a lot for different battery levels, so I had to switch to fully charged batteryu frequently for constant rotation.
Execution + Video
The video shows that the robot is able to stop at each waypoint of the arena. Due to accumulating errors, the robot isn't directly on top of the waypoint, but it has error less than 10 centimeters. Since the whole execution was done in open loop control with PD control of each step, small errors accumulated each step of the run. Thus, the success rate each time fluctuated, depending on the tire condition, batter level and dust accumulation.
When going from waypoint 5 to 6, the robot goes slightly off screen. This was because since robot was facing slightly to the left, it recorded the distance from itself and the big box in the right corner. However, as it went backwards, it actually hit the bottom wall and reorientated itself, allowing to meaure the proper wall (top) and move forward to the next waypoint. Overall, I am pretty satisfied with the results, as it was able to reach all waypoitns quite successfully without needing some 'human help' or critical errors.
The full code is attached in the appendix below.
Conclusion
Because the robot never know where its position was in the arena, all the small errors at each step of PD control added up quickly and made it really hard to have consecutively successful runs. I am disappointed that I couldn't finish up the class with a successful run of integrating localization in the final lab, but overall satisfied with the results. One note is that because the motor is so dependent to the battery level, it was crucial to use fully-charged batteries both in calibration and execution.
______________________________________________________________________
Reflection and THANK YOUs
I want to thank the wonderful staff for holding open lab hours until the last day of exams and all the support that they gave me throughout the semester! It was definitely a challenging course as a MechE who didn't have a lot of robotics knowledge before coming in, but it was definitely worth it.
This is my last semester at Cornell and probably the last engineering experience I am going to have for the rest of my career (I am actually going to law school after grad -- I know, it's crazy :) ), but it was such a memorable and unforgettable experience. (If anyone invents some crazy robots and want to patent them, contact me in three years! ) Again, huge thank you to Professor Petersen, TAs and lab mates for an awesome semester!
______________________________________________________________________
Appendix
Arduino:
Python: